[draft] Must have 2 year old board games

This is just a draft as of today. I am trying to list all the games we bought for our 2-year old and make an aggregate view of what works and what did not work for him. Keep in mind those each kid is different and yours will be different in interest of those things.

We started trying to teach our son board games when he was at the age of 2 because we found out that he has a good sense of logical thinking — as in he is very happily playing with constructing toy cars, screwing and unscrewing parts of his toys, and organizing same type of toys together such as lining up his car. Those cute little actions made us certain that he is more capable now to enter the board game adventure.

I will keep updating this as we get him to try different board games, but please, each kid is different and we just need to try provide more. I work for a gaming company and am super proud to introduce my kid to the world of gaming. The games listed here could all be an interest to your child, and it will be hard for me to believe if none of them if of interest to your child.

  • HABA My Very First Games
  • HABA Town Maze Magnetic 
  • HABA My First Treasury of Games a Great Big Game Collection
  • Osmo – Little Genius Starter Kit for iPad
  • Coogam Wooden Pattern Blocks
  • Fisher-Price Deluxe Kick ‘n Play Piano Gym
  • HABA Wild Animals 10 Piece Layered Wooden Puzzle
  • Award Winning Hape Dynamo Kid’s Wooden Domino Set
  • Bristle Blocks by Battat – The Official Bristle Blocks – 112Piece 
  • Hape Alphabet Blocks Learning Puzzle
  • BRIO 33097 Cargo Railway Deluxe Set
  • Play-Doh Modeling Compound
  • Battat – Take-Apart Crane – Take-Apart Toy Crane Truck with Toy Drill
  • Hape Construction Site Kid’s Wooden Toddler Peg Puzzle
  • Schleich Wild Life Starter-Set Action Figure
  • Green Toys Airplane
  • HABA Wooden Puzzle My time of Year with Four Layers
  • Melissa & Doug Shape Sorting Cube
  • Hape Totally Amazing Under The Sea Blocks
  • Melissa & Doug Reusable Sticker Pads Set: Prehistoric, Habitats, and Vehicles
  • Melissa & Doug Sticker Collection – Blue
  • Melissa & Doug Deluxe Magnetic Standing Art Easel
  • Melissa & Doug Solar System Floor Puzzle (48 pc)
  • VTech Drop & Go Dump Truck
  • Melissa & Doug Dust! Sweep! Mop!
  • Kinetic Sand Folding Sand Box with 2 Pounds of Kinetic Sand
  • Melissa & Doug Cutting Fruit Set – The Original (Wooden Play Food Kids Toy, Wooden Crate, 17 Pieces
  • B. toys – B. Ready Beach Bag – Beach Tote with Mesh Panel and 11 Funky Sand Toys
  • Sharper Image Interactive RC Robotosaur Dinosaur
  • FREE TO FLY Large Aqua Drawing Mat
  • PicassoTiles 60 Piece Set 60pcs Magnet Building Tiles Clear Magnetic
  • Goodnight, Goodnight, Construction Site Stacking Nesting Block Set 
  • LEGO DUPLO All-in-One-Box-of-Fun Building Kit 10572
  • Ravensburger Gravitrax Starter Set Marble Run
  • Zoch Verlag Ghost Blitz 
  • Melissa & Doug Deluxe Magnetic Pattern Blocks Set
  • Learning Resources Sum Swamp Game
  • Melissa & Doug Wooden Jigsaw Puzzles in a Box 
  • Magnetic Drawing Board Toddler Toys 
  • MAGIFIRE Wooden Toddler Puzzles Gifts Toys
  • Melissa & Doug Pattern Blocks and Boards
  • Educational Insights The Sneaky, Snacky Squirrel Toddler

In the next section I will give comments to each one of those toys, before I forget when he grows to 3.

convert managed table on databricks to external table

sometimes I had AnalysisException: Cannot set or change the preserved property key: ‘EXTERNAL’ when converting the table.

import org.apache.spark.sql.catalyst.TableIdentifier
import org.apache.spark.sql.catalyst.catalog.CatalogTable
import org.apache.spark.sql.catalyst.catalog.CatalogTableType

val identifier = TableIdentifier("table_name", Some("database"))
val oldTable = spark.sessionState.catalog.getTableMetadata(identifier)
val newTableType = CatalogTableType.EXTERNAL

val alteredTable = oldTable.copy(tableType = newTableType)

spark.sessionState.catalog.alterTable(alteredTable)

this will do the trick.

Convert nested spark table Row structs to python dicts in functions, and then convert processed Rows to dataframes

Its been a while since I used flatMaps in spark, and most often it can be replaced by using Explode. But in my case today, I constructed a list of Rows and then converted them to an actual DF without the painful schema registry using rdd operations.

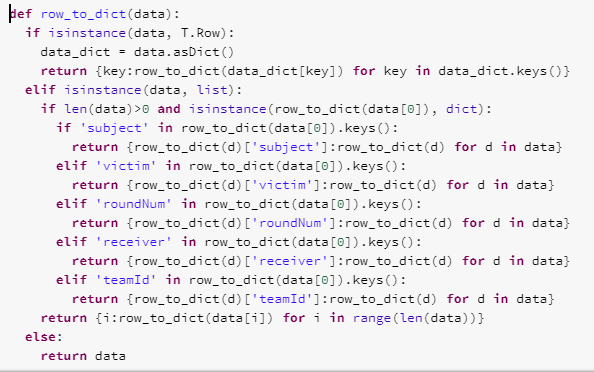
now, input is kinda messy and I used my convert functions to convert everything into dictionaries should they come in:

Of course, there are many other processing steps, this is just converting the massively nested data into the ones that I like to see, into easy python dictionaries instead of the nasty spark Row objects.

Now I can do my processing based on the converted data.

After that when I have to save the data, I did something like

def process_df(a,b,c):

....

return [T.Row(**item) for item in processed_data.values()]

so they become one list of Rows. Then, in order to convert the list of Row back to the df, I did this

df = data.rdd.flatMap(lambda x:process_df(x[0], x[1], x[2])).toDF()

there it is! The nested ugly dataframe now has been turned into a flat structure and much easier to get analysis going.

Heat map subplots sharing same color bar pandas with seaborn

Make sure you have pandas and seaborn installed

plt.cla()
plt.close()
fig, (ax0,ax1) = plt.subplots(1, 2, sharex=True, sharey=True)
cbar_ax = fig.add_axes([.91,.3,.03,.4])
sns.heatmap(pd1.corr(),ax=ax0,cbar=True,vmin=-1,vmax=1,cbar_ax = cbar_ax)
ax0.set_title('title1')
sns.heatmap(pd2.corr(),ax=ax1,cbar=True,vmin=-1,vmax=1,cbar_ax = cbar_ax)
ax1.set_title('title 2')
fig.suptitle('big title',fontsize=20)
#saving figure for publication if needed
plt.savefig('save.tif', dpi=300)
plt.show()

thats it! I guess the most important thing here is cbar_ax = fig.add_axes([.91,.3,.03,.4]) and make sure you have a fixed vmin and vmax.

source: http://stackoverflow.com/questions/24653986/saving-matplotlib-figure-with-add-axes

Signing an unsignable PDF

Normally for us, signing PDFs should be easy. But thats why you come here.

The trick for the article is to help you get an unsignable PDF signed electronically and relatively unpainful. Follow the steps below you will get your pdf signed, and sent back. Assuming you have ghostscript, gimp installed, and assuming you are using mac. (both are free btw)

if you dont know how to install ghostscript and gimp, refer to my other post
install ghostscript and gimp

  1. You should do as much possible to fill in the information, up till you cannot fill any more. Assuming you have ghostscript, gimp installed. (both are free btw)
  2. At this point, save your pdf and then use the command (assuming your pdf file is called convert.pdf)

    gs -q -dSafer -dBatch -dNOPAUSE -sDEVICE=tiff32nc -r300 -sOutputFile=convert.tif convert.pdf -c quit

    Your converted picture file will be called convert.tif and it is in 300 dpi.
  3. Now open the convert.tif in gimp, sign using the draw tool. When you are finished, go to file->export and export as result.pdf (type it is easy).
  4. Now that you finished, close all windows, send the file to the email address requesting the signed pdf. Done. You have saved a tree branch for the earth. LOL

How to make Custom estimator class and custom scorer to do cross validation using sklearn api on your custom model

I made a combined weak classifier model, needed a custom estimator and custom scorer. I went through a few stack overflow articles however none actually targeted specifically for cross validation in sklearn.

Then I figured I would try to implement baseestimator class, and make my own scorer. It WORKED. :>

Therefore, I am posting instructions here on how to use it, hopefully its gonna be useful to you.

Steps:

  1. Write your own estimator class, just make sure to implement base estimator (or extend I am not sure how this works in python but its similar. base estimator is like an interface or abstract class provides basic functionalities for estimator)
  2. Write your loss function or gain function, and then make your own scorer
  3. Use the sklearn api to do cross validation. Using whatever you have created in 1 and 2.

Code: Please read comments. Important.

#create a custom estimator class

#Keep in mind. This is just a simplified version. You can treat it as any other class, just make sure the signitures should stay same, or you should add default value to other parameters

from sklearn.base import BaseEstimator
class custom_classifier(BaseEstimator):
  from sklearn import tree
  from sklearn.cluster import KMeans
  import numpy as np
  from sklearn.cluster import KMeans
  #Kmeans clustering model
  __clusters = None
  #decision tree model
  __tree = None
  #x library.
  __X = None
  #y library.
  __y = None
  #columns selected from pandas dataframe.
  __columns = None

  def fit(self, X, y, **kwargs):
    self.fit_kmeans(self.__X,self.__y)
    self.fit_decisiontree(self.__X,self.__y)

  def predict(self,X):
    result_kmeans = self.__clusters.predict(X)
    result_tree = self.__tree.predict(X)
    result = result_tree
    return np.array(result)

  def fit_kmeans(self,X,y):
    clusters = KMeans(n_clusters=4, random_state=0).fit(X)
    #the error center should have the lowest number of labels.(implementation not shown here)
    self.__clusters = clusters

  def fit_decisiontree(self,X,y):
    temp_tree = tree.DecisionTreeClassifier(criterion='entropy',max_depth=3)
    temp_tree.fit(X,y)
    self.__tree = temp_tree

Now we have our class. We need to build hit/loss function:

#again, feel free to change any thing in the hit function. As long as the function signature remain the same.

def seg_tree_hit_func(ground_truth, predictions):
  total_hit = 0
  total_number = 0
  for i in xrange(len(predictions)):
    if predictions[i]==2:
      continue
    else:
      total_hit += (1-abs(ground_truth[i]-predictions[i]))
      total_number+=1.0
    print 'skipped: ',len(predictions)- total_number,'/',len(predictions),'instances'
  return total_hit/total_number if total_number!=0 else 0

Now we still need to build scorer.

from sklearn.metrics.scorer import make_scorer

#make our own scorer
score = make_scorer(seg_tree_hit_func, greater_is_better=True)

We have our scorer, our estimator, and so we can start doing cross-validation task:

#change the 7 to whatever fold validation you are running.

scores = cross_val_score(custom_classifier(), X, Y, cv=7, scoring=score)

There it is! You have your own scorer and estimator, and you can use sklearn api to plug it in anything from sklearn easily.


Hope this helps.
Converting Excel workbook to 300dpi high definition publishable tiff (after converting to pdf)

I got really frustrated when trying to convert my charts and excel worksheets into publishable content for my paper. Went through several stack overflow questions and used ghostscript to make it possible.

All softwares used in this post are free — $0. It is ideal for Ph.D students or home use for publishing.

  1. Install ghostscript, using homebrew just run brew install GhostScript and you are good.
  2. Install Gimp. From homebrew all you have to do is: brew install Caskroom/cask/gimp
  3. Open your excel worksheet. Set the page setup to be vertical or horizontal, select your area as print area, and then save as pdf. Make sure you save the workbook as pdf. E.g. now I have saved the workbook to be figure1.pdf
  4. In your command line, type  gs -q -dSafer -dBatch -dNOPAUSE -sDEVICE=tiff32nc -r300 -sOutputFile=figure1.tif figure1.pdf -c quit
  5. Open the figure1.tif in Gimp, select the area you want, and then choose image -> fit canvas to selection
  6. In file->export as simple export the file as figure1.tiff you are all set. If you look at the properties it has 300dpi.

You can easily use bash to do batch processing for pdf files, but for more accurate image selection you still need gimp.

Hope this will help other people!

references:

http://www.ghostscript.com/doc/current/Use.htm#PDF_switches